This is the multi-page printable view of this section. Click here to print.
Gameplay Guide
1 - Defining your Character
We use two mods that allow us to further differentiate our characters, building a backstory for them as well as defining their “class”. Follow the steps below to set up and understand these two mods.
Dealing with Backstories
I’ve done my best do describe the mod below, but you should really read the mod page at the link above if you are interested in using this mod. It does a lot!
This mod adds three powers to your Spell menu. These three powers allow you to do a few different things in terms of how you your characters backstory will be formed. You should ONLY use the Powers added by this mod after you have left the Alternate Perspective starting room (where you begin on a New Game).
By using the “Forget your Past” or “Focus on the Present” powers, you will start the game like vanilla, with no additional buffs or debuffs, and with normal starting skills. This will also remove all three powers the mod adds from your powers menu.
By using the “Let Time Pass” power, you are able to basically wait for a significant period of time. This allows you to emulate “settling down” after accomplishing a major task such as completing a questline.
If you use the “Remember your Past” power, you will enter a special area where you will “write” your characters backstory. This will NOT clear your inventory. Walk up to the large tome in the center of the room and activate it with E (this does not have a visible activator text, activate it anyways). This will bring up a smithing style menu, where you can use your “resources”, which represent your “trait counts” (similar to how character creation in Fallout games works) to select what traits your character has.
These traits are not made immediately obvious from the selections. This is by design, you are meant to choose options that would suit your character, which will in turn give you a set of buffs/debuffs that suit your choices. You will also receive starting skill changes based on these choices. If you are interested in knowing exactly what each selection does, the mod author has provided images detailing what each choice does on the mod page.
After you have exhausted all options in the tome, walk into the dark end of the hallway and press E (there is another invisible activator here). The mod takes some time to finalize everything and send you back to your original location. You can run around and look at the things that are in the hall to pass time.
This mod is mostly for role-playing, you can completely avoid the mod if it does not interest you.
Sets of Skills
This mod adds a very simple and non-intrusive class system to the game, that can work alongside Dealing with Backstories perfectly. You can access the perk trees for this mod in the Custom Skills menu in your Tween menu (press TAB in game).
Within the “Path of the Warrior”, “Path of the Mage”, “Path of the Thief” or “Path of the Priest” perk trees, you can add new benefits to your character that suit your build, and further differentiate them!
NEXT -> Major Questline Changes
2 - Major Questline Changes
We use At Your Own Pace to modify the pacing of the Main Quest, College of Winterhold, and The Companions questlines. This mod makes changes to a LOT of familiar aspects of these quests, so you may feel like something is not working correctly at times. We also use a few other mods that modify the other questlines.
Read the mod pages thoroughly to know what to expect! At Your Own Pace in particular adds a LOT of new possibilities for these questlines. You should not have any problem blind playing, but you can learn of all the new scenarios in advance by reading the mod page.
Main Quest
The Main Quest has various stopping points that will certainly throw you off if you are expecting vanilla behavior. For instance, you will always find the Horn of Jurgen Windcaller in Ustengrav, and can return it to the Greybeards. You will need to speak to Farengar on your own to further advance the quest, where he will have Delphine send you a letter in a few days.
The College of Winterhold
In combination with College of Winterhold - Quest Expansion, you will not be able to start Saarthal until you have completed the quests for the masters of each school of magic, which are added by the Quest Expansion. Unless you sign on to the Saarthal expedition as a worker (read the mod page!)
The Companions
The Companions questline now also requires a great deal more Radiant quests to advance, while also allowing you to take multiple quests at a time. There are also quite a few changes to how certain parts of the questline work, allowing more types of characters to reasonably be a companion than before.
The Thieves Guild
For the Thieves Guild, we are using Thieves Guild Requirements in order to restrict when the Thieves Guild questline can begin. You will find that Brynjolf will not offer you any jobs unless you are someone who actually commits larceny.
The Dark Brotherhood
For the Dark Brotherhood, we are utilizing Save the Dark Brotherhood and Your Choices Matter - A Dark Brotherhood Expansion to create more scenarios for the player to choose.
NEXT -> New Mechanics to Know
3 - New Mechanics to Know
Below you will find a list of important new game mechanics that you should certainly know about before playing the list. This does not cover every new mechanic! Read the Notable Mods sections after you have finished the Mandatory Reading sections for even more information.
Complete Combat Overhaul
The way you will perform combat in this mod list is drastically different from Vanilla, in such a way that it is hardly recognizable. These changes are subject to their own page, read about all of the mods affecting combat here!
The above linked page is rather long, and I would suggest you read it after finishing the Mandatory Reading section. You certainly do not have to read it word-for-word, I did my best to describe each mod in as much detail as possible.
Equip your armor, weapons, and magic with LamasTinyHUD and Wheeler
LamasTinyHUD and Wheeler provide you with instant access to your entire arsenal of armor, weapons, and magic. With LamasTinyHUD, you can configure sequential loadouts for gear in your left and right hands, as well as your Shouts/Powers. The mod also allows you to cycle through restoration potions for health, stamina, and magicka. The mod will intelligently use the best restoration potion it can use. You can also place any potion of your choosing in the loadout.
You can name and select your active Preset within the MCM menu. Your loadout presets are saved to .ini files inside the Overwrite mod, at the bottom of the left pane of Mod Organizer within the SKSE/Plugins folder.
Wheeler allows you to access a Wheel Menu, one which is extremely responsive and easy to use. You can add multiple pages to your Wheel Menu, and add a large amount of items to each wheel.
To learn how to use both of these mods, be sure to check the Important Hotkeys Wiki page to see all available hotkeys, as well as what you need to do to utilize them. It would also be a great idea for you to read the mod pages for both of these mods, as they will provide you with even more information about how they work.
The dialogue camera will switch between you and the NPC
When you are speaking to an NPC, the camera will turn to face the speaking NPC. This provides a great boost of immersion for many, but it is quite subjective. If you dislike this, press F while in dialogue to switch to the 1st person dialogue camera.
Access new Custom Skill Menus in the Tween Menu
When you open your Tween menu, you will notice you now have an extra button labeled “Custom Skills”. Within here, you will find six new skill trees that you can progress through! There are four trees for Warriors, Mages, Thieves, and Priests respectively. These four trees are a part of the Sets of Skills mod that you can read about here, and allow you to further buff your character with benefits specific to your build! You will get a new perk point to use in either of these trees on a new game, as well as every 5 levels.
You will also find the following three unique perk trees;
- A “Dragonborn” tree, dedicated to increasing the power of your Shouts!
- A “Sanguine Contempt” tree, dedicated to increasing your vampiric powers!
- A “Vigilant of Stendarr” tree, dedicated to increasing your combat prowess against undead and daedra!
If you meet either of those bills, be sure to check the perk trees and read the descriptions of them in the UI!
Play the Triple Triad card game with NPCs
As you loot NPCs, you will come across a variety of Card Packs that will give you different “Triple Triad” cards. With these, you will be able to play the Triple Triad game with most NPCs in the world! In order to do so, you will need to buy a Triple Triad Board from a General merchant such as Belethor in Whiterun. After you own this, all cards you get from loot will be placed in a virtual chest you can access with the board in your Misc inventory section, instead of being placed in your inventory. You will also be able to challenge NPCs to a duel with a dialogue option.
This game is derived from Final Fantasy, and is relatively simple however requires a bit of learning. The winner of a Triple Triad game usually gets to take one card from the loser, and you have the option to bet Septims on a game. Depending on where you are in the world, different “rules” will be enabled that change the way the game plays!
Read the mod page for Triple Triad in Skyrim at the following link for the rules of the game! Triple Triad Card Game Mod Page
Interact with NPCs from a distance
You can have conversations with any NPC from a distance! Press the B key to initiate Remote Interactions! This allows you to have full conversations with any NPC without being next to them, opening up a huge door for immersion in many situations. You can use this against enemies as well, potentially opening up new strategies in combat!
Knock on doors
If you interact with a locked door in non-hostile areas, you are given the option to knock on the door instead of pick the lock. If there is an NPC inside, there is a chance they will let you in! This chance is improved dramatically if you have a relationship of some type with the NPC who owns the dwelling.
Light up the area with your Quick Lantern
By using the L key, you can turn on your Quick Light! This replaces a Torch, and can be configured to be a Candlelight spell instead within the MCM.
Fast traveling requires Gold
When you Fast Travel, you will be charged Gold! The amount is dictated by how far you are traveling. You can still fast travel if you don’t have enough Gold, but you will incur Fast Travel Debt. Incurred debt will be included in the cost of subsequent fast travels until you have enough money to clear it.
Climb any ledge that you could reasonably climb, or jump over any wall you could vault over
When you walk up to a ledge that your character could reasonably climb, you will see a glowing green orb appear at the ledge. Press your Jump key (ALT by default), to initiate a climbing animation! This is very Assassins Creed-style, allowing to to scale just about anything! The same thing will occur when you walk up to a low wall/fence that your character could vault over.
Throughout the world, you may also find glowing glowing white orbs. These are pre-placed traversal points, and can allow you to climb up a larger ledge, climb a ladder, or any number of things. Keep an eye out for them!
Lay down on the ground
By performing either one of the following actions, you can lay down on the ground! This prevents enemies from seeing you, but it does not make your hitbox smaller. We can hope for Dynamic Collision Adjustment compatibility in the future!
- Hold SHIFT while sneaking to slowly go prone.
- SHIFT + W while sneaking to jump into prone.
- Hold SHIFT while prone to get up again.
- SHIFT + A/D to roll left or right respectively.
Keep in mind that you can only perform this action with your weapons sheathed. You cannot lie down with your weapons, fists, or magic out.
Find and use a variety of new weapon types
As you play, you will find many new weapon types such as Rapiers, Katanas, Pikes, Halberds, Quarterstaves, Scythes, and more! These weapons have varying damage values for the tier they are in, to compensate for the usually faster animations involved. These weapons benefit from existing weapon type perks. Make sure to take note of the following;
- All Pikes, Halberds, Scythes and Quarterstaves in the game are classified as Battleaxes, and will benefit from perks for Battleaxes.
- All Rapiers and Katanas in the game are classified as Swords, and will benefit from perks for Swords.
- Claws in the game are classified as Daggers, and will benefit from perks for Daggers.
- Whips in the game are classified as Maces, and will benefit from perks for Maces.
- Dai-Katana weapons in the game are classified as Greatswords, and will benefit from perks for Greatswords, despite their “Katana” keyword in the Inventory.
Throw a stone to distract enemies
With the Throw Stone power, you can throw a small stone you found on the ground. This allows you to get the attention of enemies, and send them where you would like quite easily, without wasting arrows or even needing a bow. You can also use these to trigger Runes, for you Warriors with no spells.
Conceal your identity with face masks
At a Tanning Rack in the Clothing category, you can craft a variety of colored Face Masks. When equipped, these face masks will prevent you from getting a bounty for crimes you commit while wearing the mask! If anyone sees you put on or take off the mask, any bounty will be automatically transferred over. Be sure to put on and take off the mask while you are out of sight!
Peek through keyholes in doors
By walking up to most doors, and holding SHIFT and pressing E, you can initiate a door peek! This will allow you to view what is behind a door before opening it. You cannot do this to all doors, and you will receive a notification message if you try to do this on a incompatible door.
Use SHIFT + Interact to initiate a few unique animations
With the same functionality is the above “Peeking”, feature, you can use SHIFT + E to initiate a few unique things! If a bard is playing music, this allows you to clap for them! You can also pet your horse rather than jumping onto it. Try it out on various things!
Open locks with a Two-Handed weapon or Fists
Power attacking a locked chest, door, or even wire-trap with a Two-Handed weapon or your Fists can potentially unlock it! Whether or not you unlock the lock or not, depends on either your Two-Handed skill, Hand-to-Hand skill or Stamina amount. Reference the below table to see what you can unlock at which levels. Your Security skill will be increased if you successfully destroy a lock this way. If you do not have the requisite skill level or stamina, nothing will happen when you attempt.
| Novice | Apprentice | Adept | Expert | Master |
|---|---|---|---|---|
| Stamina: 100 | Stamina: 125 | Stamina: 175 | Stamina: 225 | Stamina: 275 |
| Skill Level: Level 20 | Skill Level: Level 30 | Skill Level: Level 40 | Skill Level: Level 60 | Skill Level: Level 80 |
Many locked chests within Dungeons now have a key
Many previously unlocked chests in Dungeons are now locked, and have a hand-placed key somewhere nearby. This provides more opportunity to pick or bash locks, but you can always find them if you look hard enough. Better Third Person Selection also makes it much easier to spot these keys!
Have blacksmiths and mages craft and enchant things for you
By speaking to a Blacksmith, you can ask them to improve your gear, or craft entirely new equipment from the Forge menu! This will cost you Gold, at a much higher rate than the materials would cost themselves. Blacksmith’s can also only craft gear up to their Smithing level.
You can also commission Court Mages and certain other mages to enchant or recharge your gear!
Casting spells takes a lot longer if you are not skilled
If you have a low skill level in a School of Magic, it can take you a very long time to cast spells. As you level up a skill, it will take you significantly less time to cast respective spells. You will reach Vanilla cast speed at Level 30 in a skill, and have near-instant cast times at Level 100!
You can no longer instantly learn spells
Instead of consuming a Spell Tome instantly, you will instead be offered a choice of how many hours you wish to study the spell tome. After you have studied the specified amount of hours, you will learn the spell. The amount of hours required is dictated by your skill in the respective School of Magic for the Spell Tome. You can study in sessions, to spread out your learning. If you are very unskilled, it can take you a very long time to learn a high-level spell!
Cast Spells as Lesser Powers
Using the Voice Spell powers in your Powers menu, you can assign Spells of your choice to a Power! This will, in short, allow you to cast spells of your choice like a shout! This is great for Alteration or Illusion spells, but can also be used for Destruction spells! This mod opens up a new door for Spellsword gameplay!
You can actually sleep in beds
When you activate a bed, your player will get onto the bed, tuck themselves in, and start snoozing! You can remain in this sleeping idle for as long as you want. To actually sleep, press the T (wait) button, which will open the sleeping menu. Pressing any other keys while in the idle will cause your character to get up.
You can decant your Potions at a Cooking Pot
This allows you to turn all of your small restoration potions into larger ones. For instance, 3 Minor Health Potions becomes 1 Plentiful Health Potion, and so on. You can convert directly from Minor to Ultimate potions! This only works with the base restoration potions, and not with player-made restoration potions.
NEXT -> Important Hotkeys
4 - Important Hotkeys
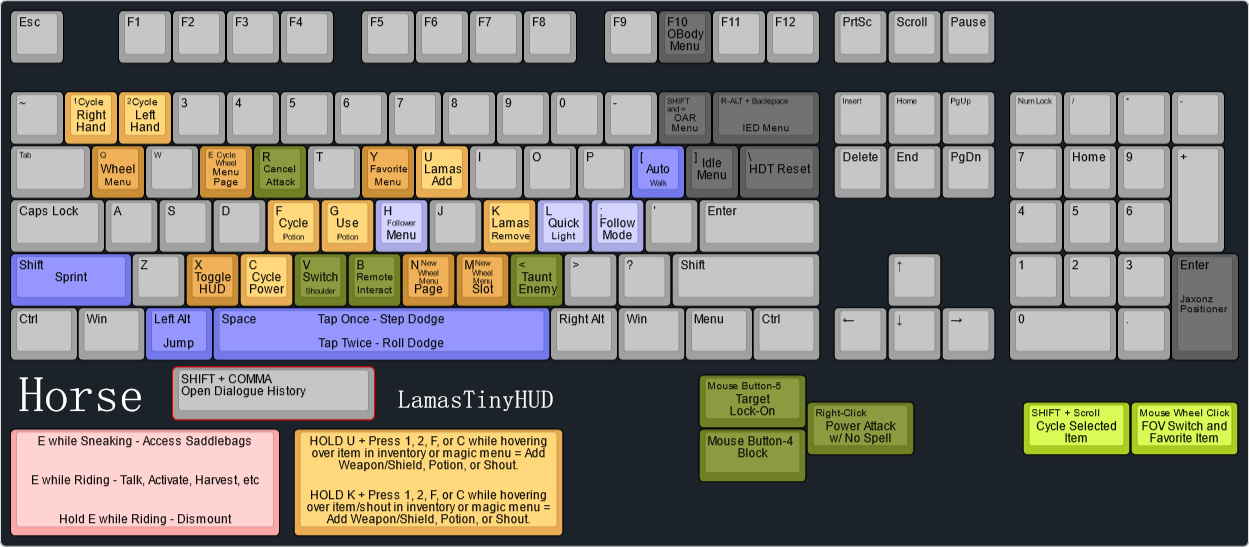
Only newly added or changed vanilla hotkeys are listed here. Listed alongside each keybind you will see where you can change this keybind. If you do not see a keybind here, then it is as it is in vanilla. Let me know if you find this is not the case!
Regarding changing your keybinds
If you want to change keybinds in game with your keyboard, you must unplug your controllers. Otherwise, you will be unable to do so.
LamasTinyHUD
LamasTinyHUD is used to set up sequential equipment loadouts that allow you to instantly swap weapons and magic in your left and right hands, shouts and powers, as well as potions with hotkeys. It can take a moment to get used to seamlessly modifying your loadout, but it is very simple in functionality.
If you would like a video explanation, here is one provided by the mod author. It would be best to read the below before watching the video, to better understand what is going on.
You can change the LamasTinyHUD keybinds from the mod’s MCM.
Adding and Removing items from your queues
HOLD U + Press 1, 2, F, or C while hovering over item in inventory or magic menu to add Weapon/Shield, Potion, or Shout to respective queue.
- To bind things to new keys, hover over the item/shout in question, and HOLD U and then hit the key you want to assign it to.
HOLD K + Press 1, 2, F, or C while hovering over item/shout in inventory or magic menu to remove Weapon/Shield, Potion, or Shout from respective queue
- To remove things from a key, hover over the item/shout in question, and HOLD K and then hit the key you want to un-assign from
1
- Cycle your right hand loadout.
2
- Cycle your left hand loadout.
F
- Cycle your potions.
- You can also use this to switch to 1st person camera during dialogue.
G
- Use your selected potion.
C
- Cycle your Shouts/Powers
Wheeler - Wheel Menu
Wheeler is a fantastic mod you can use to manage often accessed items in an incredibly fluid and easy way. The mod has rich functionality, packed into a short set of keybinds.
You can change the keybinds for Wheeler from within the “dMenu”.
For information on configurating the Wheel Menu, read the mod page description here, or watch this video by ARJARIM on it’s use here!
Adding and Removing items from the Wheel Menu
Before you can add things to the wheel menu, you need to create a slot. While in the inventory, hold the Wheeler keybind Q, and press M. This will create an empty slot. You can add as many slots as you want, and you can add new pages with the N key. You can scroll through your pages while in the wheel menu by pressing E.
To insert an item or magic into a slot, hover over the item/spell you wish to add in the inventory/magic menu, open the wheel with the Q hotkey, and left-click on the entry you wish to insert the item into.
To delete an item from a slot, open the wheel with the Q hotkey while in the Inventory, and right-click on the item you wish to delete. Right-clicking on an empty slot deletes the slot. Right-clicking on an empty wheel deletes the wheel (you can’t delete the last wheel).
Equip items to your right or left hand from the Wheel Menu with Left Click and Right Click respectively.
Q
- Open the Wheeler “Wheel Menu”.
N
- Create an empty wheel page while in Edit mode.
M
- Create an empty slot on the current wheel while in Edit mode.
E
- Scroll Wheel Menu pages while in the Wheel Menu
HUD and Camera
X
- Show/Hide your Compass and Clock.
- Can be changed in the “Immersive HUD” MCM.
Middle-Mouse Click
- Switch from 1st person to 3rd person and vice-versa while outside of your inventory.
- You will also use this key to favorite an item in your inventory. This will not conflict with the above
- This can be changed in the Vanilla controls menu.
Hold SHIFT + Scroll Mouse Wheel
- Cycle through which item you want to interact with in the world while in 3rd person.
- This can be changed in the “Better Third Person Selection” MCM.
Y
- Open the vanilla Favorites Menu while outside your inventory.
- This can be changed in the Vanilla controls menu.
V
- Switch the shoulder the camera is viewing over. Only applies when a ranged weapon or magic is unsheathed.
- This can be changed in the SmoothCam MCM menu.
Movement
L-ALT
- Jump.
- This can be changed in the Vanilla controls menu.
L-SHIFT
- Sprint.
- This can be changed in the Vanilla controls menu.
SPACE
- Perform a step dodge.
- You can change the key for dodging in the “Dodge Framework” MCM. Within this menu, you can also allow dodging to occur with the sprint key. Sprinting will occur instead if you hold the sprint key.
Double-tap SPACE
- Perform a roll dodge.
- Refer to above to change this keybind.
[
- Enable Auto-Walk
- This can be changed in the Vanilla controls menu.
Combat
Mouse RIGHT-CLICK
- Power Attack (IMPORTANT: when using magic, power attacking is done like vanilla, by holding LEFT-CLICK).
- Perform a Counter immediately after blocking an enemy attack.
- For instructions on changing this keybind, refer to this guide.
Mouse BUTTON-4
- Block (can be used when dual-wielding or when you otherwise couldn’t block).
- For instructions on changing this keybind, refer to this guide.
Mouse BUTTON-5
- Target Lock-On. This key will also force the camera to face where your character is facing, if you have no lock on target.
- This can be changed in the “True Directional Movement” MCM.
R
- Cancel an activate attack. This is also still used to sheath/ready your weapon.
- Due to an issue with the Cancel Attack mod, you cannot change this hotkey easily.
COMMA
- Perform an animated taunt, which will temporarily boost your stats.
- This can be changed in the “Taunt / Remote Int” MCM
General Gameplay
B
- Remotely Interact with NPCs
- This can be changed in the “Taunt / Remote Int” MCM
H
- Open the Follower Command Menu, where you can perform a number of functions with all or a selected amount of your followers.
- This can be changed in the “Swiftly Order Squad” MCM.
L
- Turn your Quick Light on/off (whether this light is a Candlelight spell or a lantern can be configured in the Quick Light MCM).
- This can be changed in the “Quick Light” MCM.
Horses
ACTIVATE while sneaking and looking at owned horse
- Access your Horse’s saddlebags, for some additional storage
- This cannot be changed
ACTIVATE while riding a horse
- You can now pick things up, talk to NPCs, and otherwise activate things in the world while riding a horse!
- This cannot be changed
Hold ACTIVATE while riding a horse
- Dismount the horse
- You can modify how this works in the “Better Third Person Selection” MCM in the “General” tab, on the right side.
Misc
]
- Open the Idle Menu, to perform a few different idle animations.
- You can change this in the “Idle WheelMenu” MCM.
SHIFT+ENTER
- Open the ENB configuration menu.
- This can be changed in the
enblocal.inifile located in the “ENBSeries Core” mod in the left pane of Mod Organizer.
END
- Open the Community Shaders configuration menu.
- This can be changed within the Community Shaders menu itself.
HOME
- Open the dMenu configuration menu.
- This can be changed within the dMenu menu itself.
SHIFT + =
- Open the Open Animation Replacer (OAR) menu.
- This can be changed within the OAR menu itself.
Numpad ENTER
- Select an object in the world for editing with Jaxonz Positioner. Check the MCM menu for the mod for a full list of hotkeys for moving items!
- Keybinds can be modified in the “Jaxonz Positioner” MCM.
R-ALT + BACKSPACE
- Open the Immersive Equipment Displays configuration menu.
- This can be changed within the IED menu itself.
F10
- Open the OBody configuration menu. Here, you can manually change the body type your character is using, or the body type of an NPC you were looking at when you pressed the hotkey.
- This can be changed in the “OBody NG” MCM Menu.
\ (backslash)
- Perform a HDT collision reset, for when certain HDT physics get stuck and/or start stretching. Will perform an “adjusting” animation and then reset the physics.
- This can be changed in the “CollisionReset” MCM Menu.
That’s the end of the Mandatory Reading! If you want to read more about the mod list, feel free to read the other sections!